DIY Garden Bed Best Guide: Everything You Need to Know About Block Raised Garden Beds
Introduction
DIY Garden Bed Guide: There’s something deeply satisfying about growing your own vegetables, herbs, and flowers, and for many gardeners, that journey starts with building a raised garden bed. A DIY garden bed offers control over soil quality, better drainage, easier access, and a tidy, defined growing space that can transform even a modest backyard into a productive garden.
Among the many approaches available, a block raised garden bed has become one of the most popular choices, thanks to its durability, affordability, and beginner-friendly construction process. This guide covers everything you need to know about building a DIY garden bed, with a particular focus on block raised garden bed construction, including material comparisons, design styles, maintenance tips, and answers to the most common questions gardeners have before breaking ground.
Why Your Garden Bed Matters
A well-built garden bed does far more than simply mark off a growing area. Raised garden beds improve soil drainage, which is especially valuable in areas with heavy clay or poor-quality native soil. They also warm up faster in spring, allowing for an earlier planting season, and reduce soil compaction since you’re not walking directly on the growing area. For many gardeners, raised beds also mean less bending and kneeling, particularly when built at a taller height, making gardening more accessible and comfortable over time.
A thoughtfully constructed DIY garden bed also helps with pest and weed control, since it creates a physical barrier that’s easier to manage than an in-ground garden plot. And from a purely aesthetic standpoint, a neatly built garden bed — especially a block raised garden bed with its clean, structured lines — adds visual appeal and organization to any backyard or side yard space.
Different Types of Garden Beds
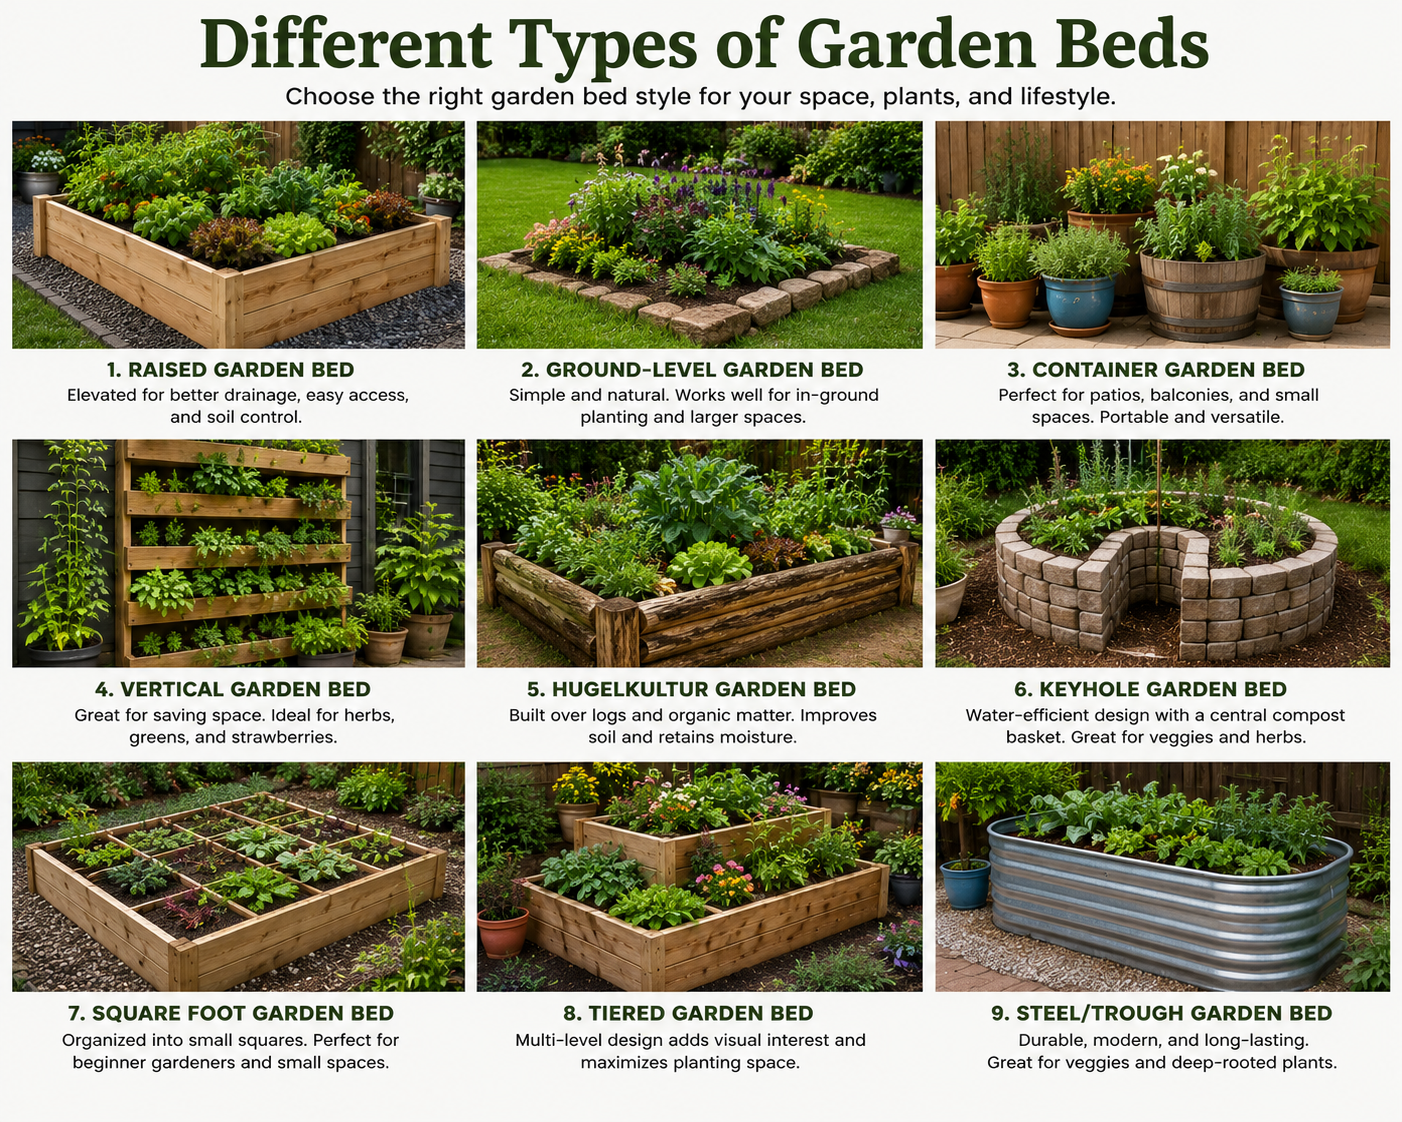
There are many approaches to building a garden bed, each with its own advantages depending on your budget, skill level, and design preferences.
- Block Raised Garden Beds: Built using concrete or cinder blocks stacked to form a sturdy, long-lasting enclosure, popular for their durability and relatively simple, no-fastener construction.
- Wooden Raised Beds: Constructed from lumber, typically cedar or pine, offering a classic, natural look and relatively straightforward DIY assembly.
- Galvanized Metal Beds: Made from corrugated steel or aluminum, these beds are increasingly popular for their modern look and long lifespan.
- Brick Raised Beds: Similar to block beds but using traditional brick for a more refined, classic aesthetic, often mortared for permanence.
- Stone Raised Beds: Built using natural stone, offering a rustic, organic appearance that blends well with naturalistic garden designs.
- Composite Lumber Beds: Made from recycled plastic-wood composite material, resistant to rot and insects, offering long-term durability with a wood-like appearance.
- Straw Bale Gardens: An unconventional approach using straw bales themselves as the growing medium and structure, popular for temporary or budget gardening.
- Keyhole Garden Beds: A circular raised bed design with a notch cut out for access to a central composting basket, popular in permaculture gardening.
- Hugelkultur Beds: Raised mounds built over buried logs and organic material, which decompose over time to enrich the soil and retain moisture.
- Fabric Raised Beds: Made from breathable fabric material, offering excellent drainage and portability, often used for container-style gardening.
- Recycled Material Beds: Built from repurposed materials like old tires, pallets, or IBC totes, offering a budget-friendly and environmentally conscious option.
- Trough or Container Raised Beds: Pre-manufactured troughs or large containers used as raised beds, offering convenience without the need for DIY construction.
Garden Bed Materials Comparison
Choosing the right material for your DIY garden bed significantly affects cost, durability, and overall appearance.
Concrete or Cinder Blocks: Highly durable, weather-resistant, and relatively inexpensive, block raised garden bed construction is popular because it requires no cutting, fastening, or specialized tools — blocks are simply stacked and, if desired, secured with landscape adhesive. Blocks also offer the bonus of small cavities that can be used to plant companion herbs or flowers along the border.
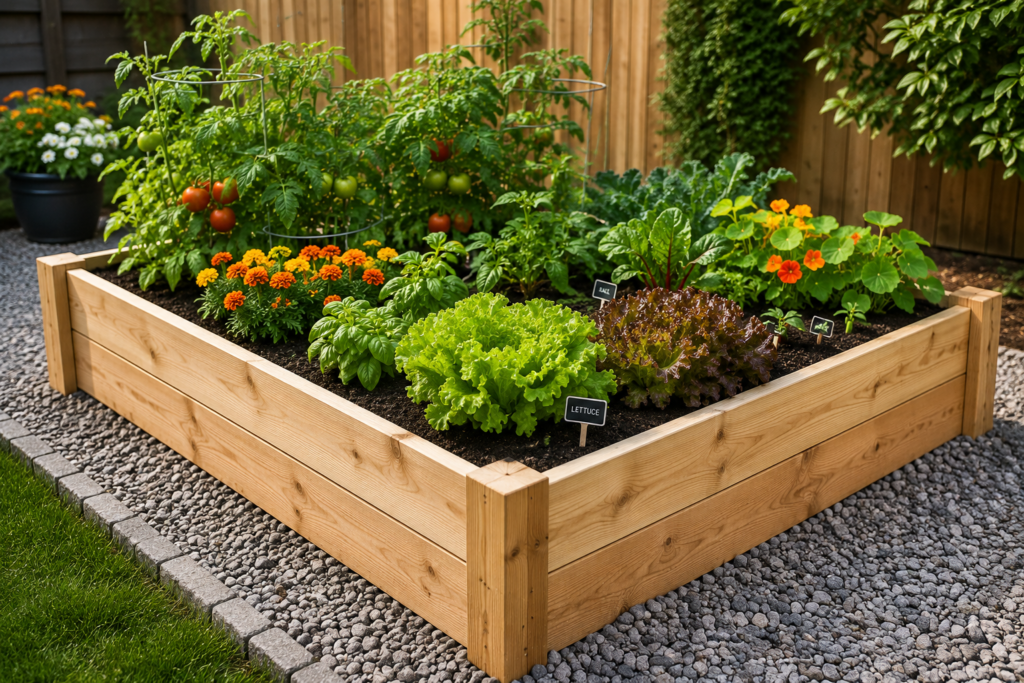
Wood (Cedar or Pine): Offers a natural, warm aesthetic and is relatively easy to cut and assemble, though untreated wood will eventually rot and require replacement, typically within 5 to 10 years depending on climate and wood type. Cedar offers better natural rot resistance compared to pine.
Galvanized Metal: Extremely durable and resistant to rot, pests, and warping, with a clean, modern appearance. However, metal beds can heat up significantly in direct sun, potentially affecting soil temperature and root health in hot climates.
Brick: Offers excellent durability and a classic, polished appearance, though it typically requires mortar for a permanent installation, adding cost and complexity compared to simpler stacking methods like block construction.
Natural Stone: Highly durable and visually distinctive, though often the most expensive and labor-intensive option, particularly if sourcing and transporting stone yourself.
Composite Lumber: Resistant to rot and insects while maintaining a wood-like appearance, though it comes at a higher price point compared to traditional lumber.
Recycled Materials: Extremely budget-friendly and environmentally conscious, though durability and appearance vary significantly depending on the specific materials used.
Garden Bed Styles Explained
Beyond material, garden beds vary in overall structural style and layout, each suited to different gardening goals.
Standard Rectangular Beds: The most common and straightforward style, offering an efficient use of space and easy access from all sides when properly sized.
L-Shaped or Corner Beds: Designed to fit into corner spaces, maximizing garden area in yards with irregular layouts.
Tiered or Multi-Level Beds: Built with varying heights, often used on sloped terrain or to create visual interest and separate distinct planting zones.
Circular or Keyhole Beds: Offer a distinctive design and, in the case of keyhole gardens, integrated composting access for efficient nutrient cycling.
Elevated Beds (Table-Height): Built significantly taller than standard raised beds, often on legs, to eliminate bending entirely — particularly popular for gardeners with mobility limitations.
Modular or Interlocking Beds: Designed with expansion in mind, allowing additional sections to be added over time as a garden grows.
Pros & Cons of Each Type
Block Raised Garden Beds
Pros: Highly durable, weather and pest resistant, no cutting or fastening required, relatively affordable, and offers bonus planting cavities within the blocks themselves.
Cons: Heavier and more labor-intensive to install compared to lightweight materials, and blocks can leach lime into soil over time, which may require occasional soil pH monitoring.
Wooden Raised Beds
Pros: Natural aesthetic, relatively affordable, and easy to cut to custom dimensions.
Cons: Prone to rot over time, particularly with cheaper wood types or in wet climates, eventually requiring replacement.
Galvanized Metal Beds
Pros: Extremely durable, modern appearance, resistant to pests and rot.
Cons: Can heat up significantly in direct sunlight, potentially stressing plant roots in very hot climates, and tends to be pricier than wood or block options.
Brick and Stone Beds
Pros: Long-lasting, visually distinctive, and adds significant property value and curb appeal.
Cons: Higher cost and labor investment, particularly if mortared for permanence.
Recycled Material Beds
Pros: Budget-friendly and environmentally conscious, using materials that might otherwise go to waste.
Cons: Variable durability and appearance, and some materials (like certain treated pallets or tires) require careful sourcing to avoid introducing chemicals into your soil.
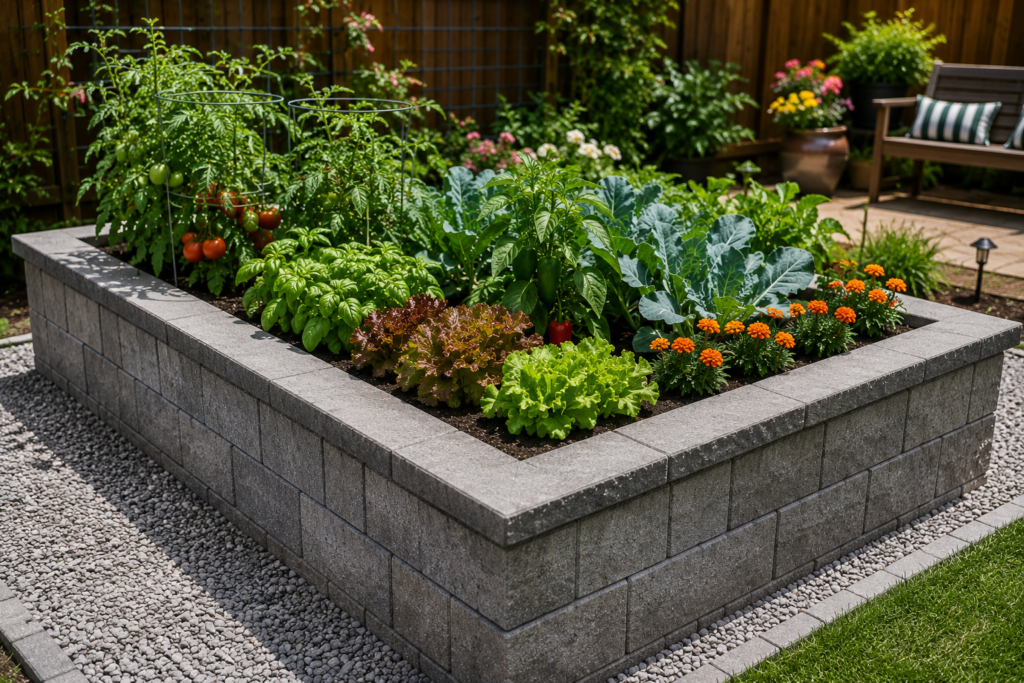
DIY Garden Bed Tips: Building a Block Raised Garden Bed
If you’ve decided a block raised garden bed is the right choice for your space, here’s a general step-by-step approach to building one successfully.
Step 1: Choose and Measure Your Location Select a spot with adequate sunlight (most vegetables need at least 6 hours of direct sun) and good drainage. Measure and mark the perimeter of your intended bed.
Step 2: Level the Ground Remove grass and debris from the area, then level the ground as much as possible to ensure your blocks sit evenly and securely.
Step 3: Plan Your Block Layout Decide on the dimensions of your bed and plan how many blocks you’ll need per row and how many rows high you want to build, keeping in mind that most vegetable gardens benefit from a height of at least 8 to 12 inches for adequate root space.
Step 4: Lay the First Row Place your first row of blocks along the marked perimeter, using a level to ensure they’re even. Adjust the ground beneath as needed for a stable, level base.
Step 5: Stack Additional Rows (If Desired) For taller beds, stack additional rows of blocks, offsetting the seams between rows for added stability, similar to traditional brick-laying patterns.
Step 6: Secure the Blocks (Optional) While many block raised garden bed designs rely simply on the weight of the blocks for stability, applying landscape adhesive between rows can add extra security, particularly for taller beds or areas prone to significant weather exposure.
Step 7: Line the Bed (Optional but Recommended) Adding a layer of landscape fabric along the base and inner walls can help prevent excessive weed growth from beneath while still allowing proper drainage.
Step 8: Fill with Quality Soil Fill your new bed with a blend of quality garden soil and compost, ensuring good drainage and nutrient content for whatever you plan to grow.
Step 9: Plant Companion Plants in Block Cavities Take advantage of the small cavities within concrete blocks by planting shallow-rooted herbs or flowers like thyme, marigolds, or alyssum directly into them for added visual interest and functional companion planting.
Step 10: Water Thoroughly Before Planting Give your new soil a thorough initial watering to help it settle before planting your main crops, adjusting soil levels as needed afterward.
Cleaning & Maintenance
Maintaining a DIY garden bed, particularly a block raised garden bed, is relatively low-effort compared to many other gardening structures. Periodically check for shifting or settling blocks, especially after winter freeze-thaw cycles, and relevel as needed. Clear out any weeds that establish themselves in the gaps between blocks before they have a chance to spread into your main growing area.
At the end of each growing season, remove spent plant material and refresh the soil with compost to maintain nutrient levels for the following season. If you notice efflorescence (a white, powdery residue) forming on your blocks, this is typically just mineral deposits from moisture and can be brushed off without concern. Periodically test your soil pH, since concrete blocks can gradually leach lime into the soil, potentially raising pH levels over time in ways that may affect certain acid-loving plants.
Common Mistakes to Avoid
Avoid choosing a location without adequate sunlight, since even a beautifully constructed garden bed won’t perform well without proper light exposure. Don’t skip checking for level ground before laying your first row of blocks, since an uneven base can lead to instability and shifting over time. Avoid using treated wood or reclaimed materials of unknown origin without researching potential chemical leaching into your soil, particularly for edible gardens.
Don’t underestimate the amount of soil needed to fill your bed, which can lead to unexpected additional costs and delays if you run short mid-project. Avoid neglecting drainage, since even raised beds can develop waterlogging issues without proper soil composition and, in some cases, drainage holes or gravel layers at the base. Finally, don’t forget to plan for pathway access around your bed, since beds that are too wide to comfortably reach the center from either side can make maintenance and harvesting unnecessarily difficult.
FAQs
1. How tall should a block raised garden bed be? Most vegetable gardens do well with a height of 8 to 12 inches, though taller beds (18 inches or more) offer easier access and better drainage for root vegetables.
2. Do I need to line a block raised garden bed? Lining with landscape fabric is optional but recommended to help control weeds while still allowing proper drainage.
3. Can I use regular cinder blocks for a vegetable garden? Yes, though some gardeners prefer to monitor soil pH over time, since concrete can gradually leach lime into the soil.
4. How much does it cost to build a DIY garden bed with blocks? Costs vary based on size, but block raised garden beds are often among the more affordable DIY options, particularly for larger beds where per-unit block costs stay low.
5. What’s the best soil mix for a raised garden bed? A blend of quality topsoil, compost, and sometimes peat moss or coconut coir for improved moisture retention works well for most raised bed gardens.
6. Do block raised garden beds need drainage holes? Since blocks are typically stacked without a solid base, drainage naturally occurs through the gaps and soil beneath, though adding a gravel layer at the base can further improve drainage in poorly draining locations.
7. How long do block raised garden beds last? Concrete and cinder blocks are extremely durable and can last for decades with minimal maintenance, significantly longer than wood-based raised beds.
8. Can I grow vegetables directly against the blocks? Yes, though leaving a small buffer of a few inches can help avoid any potential lime leaching directly affecting the roots of sensitive plants.
9. What can I plant in the holes of cinder blocks? Shallow-rooted herbs and flowers like thyme, marigolds, alyssum, or strawberries work particularly well in the small cavities of cinder blocks.
10. Is a block raised garden bed heavy to build? Yes, concrete and cinder blocks are heavier than wood, making installation more physically demanding, though the lack of cutting or fastening simplifies the actual construction process.
11. Can I stack blocks without mortar? Yes, many block raised garden beds rely simply on the weight and stacking pattern of the blocks for stability, particularly for beds one or two rows high.
12. What size garden bed is best for beginners? A standard 4-foot by 8-foot bed is a popular beginner size, offering ample growing space while remaining easy to reach from either side.
13. Do raised garden beds need full sun? Most vegetables need at least 6 hours of direct sunlight daily, though leafy greens and certain herbs can tolerate partial shade.
14. How often should I replace soil in a raised garden bed? Rather than fully replacing soil, most gardeners refresh it annually with added compost to replenish nutrients depleted by previous growing seasons.
15. Can I build a block raised garden bed on a slope? Yes, though the ground should be leveled as much as possible, or a tiered design should be used to account for significant slope changes.
Conclusion
Building a DIY garden bed is one of the most rewarding projects a home gardener can take on, offering better soil control, improved drainage, and a defined, attractive growing space. Among the many approaches available, a block raised garden bed stands out for its durability, affordability, and beginner-friendly construction process, making it an excellent choice for both first-time gardeners and experienced green thumbs looking for a long-lasting solution. With the right materials, thoughtful planning, and a bit of hands-on effort, you can build a garden bed that not only enhances your outdoor space but also supports a thriving, productive garden for years to come.